

Ciao a tutti! Spero il vostro inverno ( in Italia onestamente non c'è stato e oggi avremo almeno 15 gradi di temperatura... non commento!) stia andando bene e spero siate pronti a un'altra settimana con Simon Says Stamp Monday Challenge Blog! Oggi come tema vi suggeriamo Crack It Up. Ciò significa che dovrete usare qualcosa che abbia a che fare con il Crackle effect o con elementi spezzati e via di seguito. Potete raggiumgere l'effetto in tanti modi: paste, stencils, timbri ...viaggiate con la fantasia! Noi apettiamo di vedere cosa creerete!
Ancora con noi per la seconda settimana come Designer Spotlight di Febbraio Cristina Moriggi aka Rosso Papavero, QUI il suo splendido blog!
Hi all and welcome to another week on the Simon Says Stamp Monday Challenge
Thank you for joining us for the Floral Challenge and we hope you will all join us again this week too.
This week we are challenging you to use crackle paint, cracked glass/porcelain, broken pieces etc: Crack It Up
It's the second week of Cristina Moriggi aka Rosso Papavero as Spotlight Designer of the month of February! Go HERE to admire his works and his Blog!

Devo ammettere che le fustelle nuove di Tim Holtz sono una continua ispirazione insieme agli stencils e aai timbri di Stampers Anonymous! Ho realizzato questa tag per dedicarla a tutti quelli che hanno voglia di raccontare... prendete il coraggio e iniziate a scrivere, credo sia terapeutico!
La macchina da scrivere è il soggetto perfetto per creare il punto focale e da lì è partita la mia idea.
Anche oggi vi lascio un breve racconto diviso in punti sulla realizzazione.
1) Ho scelto i miei soggetti: fustelle timbri e stencil ( lista materiali sotto come sempre)
2) Ho coperto la mia Etcetera tag misura Mini (4.5 x 8 inch, circa 11,5x 20,5 cm) con un foglio dalla collezione Memoranda, ho scelto un paio di pezzi ( due etichette da vari Ephemera pack ) che ho incollato sulla tag e ho coperto tutto con uno strato di gesso bianco abbastanza sottile. Volevo smoprzare i colori ma volevo che fosse comunque visibile il disegno.
3) Ho aggiunto su vari punti la Ranger Texture Paste Opaque Crackle e aspettato che si formassero le crepe lasciando asciugare all'aria. Ci vuole un po' di tempo ma è molto più bello l'effetto ottenuto. Asciugare la Crackle paste con l'Heat tool è da fare solo se siete disperati con i tempi di realizzazione ( cosa che ogni tanto capita... a me...).
4) Asciugato tutto? Ora il colore. Questa volta mi sono mantenuta su toni naturali e non troppo intensi. Ho spruzzato Antique linen e Vintage Photo Distress Stain sprays su tutta la tag, spruzzato altra acqua per muovere il colore e contemporaneamente asciugare. Sul gesso l'effetto è davvero leggero, il colore rimane quasi trasparente.
5) Ho riempito le crepe e colorato le zone vicine con Distress Crayons Vintage photo, Walnut stain e Forest Moss.
6) Ho scelto un timbro con scritta vintage dal nuovo set Field Notes e timbrato in vari punti con Archival ink Ground espresso.
7) Nei punti rimasti più vuoti ho aggiunto lo stencil Halftone utilizzato insieme a Distress Crayons Forest Moss.
8) Per completare la tag ho preparato i pezzi che compongono il punto focale e la frase.
Ho tagliato con cartoncino spesso ricoperto prima con un foglio di Blackout Kraftstock la macchina da scrivere e il pezzo più chiaro nello stesso modo ma con un cartoncino dallo stash Classic.
Una volta composta la macchina da scrivere la dovete girare e dalla parte non ridcoperta stendete con una spatola la Nuovo Expanding Mousse Red Leather per riempire i tasti della macchina. Poi girate e scaldate in modo che la mousse aumenti volume e cambi texture. Macchina da scrivere pronta.
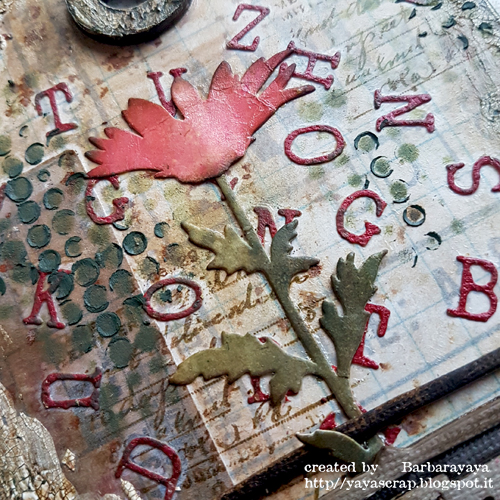
Per il fiore confesso che ho usato due ritagli già colorati che mi erano rimasti da lavori precedenti e le lettere le ho tagliate con un foglio dalla Classic Collection e la fustella Alphanumeric Tiny Type Upper e incollate casualmente come uscissero dalla machcina da scrivere.
9)Ho evidenziato i bordi con Distress crayons Forest Moss e Walnut Stain e il lavoro è finito.
Dettagli.
I must admit that Tim Holtz's new dies are a continuous inspiration together with the stencils and stamps of Stampers Anonymous! I made this tag to dedicate it to all those who want to tell ... take courage and start writing, I think it's therapeutic!
The typewriter is the perfect subject to create the focal point and my idea started from there.
Even today I leave you a short story divided into points on the realization.
1) I chose my subjects: stamps and stencils (list of materials below as always)
2) I covered my Etcetera Mini size tag (4.5 x 8 inch, about 11.5x 20.5 cm) with a sheet from the Memoranda collection, I chose a couple of pieces (two labels from various Ephemera packs) that I glued on the tag and I covered everything with a layer of fairly thin white chalk. I wanted to use colors, but at the same time, I wanted that these layers were to be visible anyway, not too opaque.
3) I added the Ranger Texture Paste Opaque Crackle on various points and waited for the cracks to form, allowing them to air dry. It takes some time but the effect is much more beautiful. Drying the Crackle paste with the Heat tool is only to be done if you are desperate with the realization times (something that sometimes happens ... to me ...).
4) Have you dried everything? Now the color. This time I kept myself on natural tones and not too intense. I sprayed Antique linen and Vintage Photo Distress Stain Sprays on the whole tag, sprayed more water to move the color and dry at the same time. On the white gesso, the effect is really light, the color remains almost transparent.
5) I filled the cracks and colored the neighboring areas with Distress Crayons Vintage Photo, Walnut Stain, and Forest Moss.
6) I chose a stamp with vintage writing from the new Field Notes set and stamped at various points with Archival ink Ground espresso.
7) In the most empty spaces, I added the Halftone stencil used together with Distress Crayons Forest Moss.
8) To complete the tag I prepared the pieces that make up the focal point and the phrase.
I covered two pieces of thick cardstock: one with Blackout Kraftstock and the other with a lighter cardstock from the Classic stash and I cut the pieces with Retro Type Bigz Die.
Once you have composed the typewriter you have to turn it and from the non-covered part, spread the New Expanding Mousse Red Leather with a spatula to fill the keys of the machine. Then turn and heat so that the mousse increases volume and changes texture. Typewriter ready.
For the flower, I confess that I used two already colored clippings that I had left from previous works, the letters I cut them with a sheet from the Classic Collection and the Alphanumeric Tiny Type Upper Thinlits Die and randomly glued.
9) I highlighted the edges with Distress crayons Forest Moss and Walnut Stain and the job is done.
Details.


Ora tocca a voi! Come sempre partecipando alla nostra sfida potrete vincere un buono a estrazione da 50$ da spendere sul favoloso store di SIMON SAYS STAMP! Potete aggiungere fino a 5 progetti per settimana!
The lovely folks over at Simon Says Stamp are generously giving away a FABULOUS $50 voucher to shop at the Simon Says Stamp Store! All you have to do is take out your crafty supplies, make something following this week’s prompt, and add a link in the Inlinkz at the bottom of this post! You can join 5 times so you could have 5 chances to win! How AWESOME is that!! All winners are chosen randomly, so everyone has an equal chance to win! Woo Hoo!! Good Luck to everyone! The Design Team is looking forward to seeing your transportation makes and will pop around to visit you ASAP!


Seguite SIMON SAYS STAMP su INSTAGRAM
Follow SIMON SAYS STAMP on INSTAGRAMSe usate Instagram potete aggiungere #sssmchallenge così potremo vedere i vostri lavori!
Do you use Instagram ? If so please add #sssmchallenge so we can see your entries there too!
Ci sono favolosi Giveaways e ispirazioni ogni giorno dai nostri favolosi designer su Simon Says Stamp Blog, se non l'avete ancora fatto iscrivetevi via e-mail per essere sempre aggiornati.
Avete tempo fino a Lunedi 08:00 ora Ohio. 13:00 UK tempo, 14:00 CET per postare i vostri lavori!
Saranno scelti alcuni progetti come Designer Spotlight , essi riceveranno uno special badge da aggiungere al loro blog! Potete leggere tutte le regole per partecipare alla sfida sul nostro blog nella side-bar!
There are fabulous Give Aways and inspiration from fabulous designers on a daily basis over on the Simon Says Stamp Blog , if you haven’t subscribed by email you may want to so you don’t miss out
You have until Monday 8am Ohio time. 1pm UK time, 2 pm CET to join in
We will also be choosing 3 of our entries to put in the spotlight – a special honor where we talk about why we loved that entry in particular and award a special badge too! For the full rules, read the “challenge rules” posted in the side-bar here on our blog.
Grazie per essere passati, ci vediamo qui presto!
Thanks for stopping by, see you soon here!
Barbara
 |  |  |  |  |
 |  |  |  |  |
 |  |  |  |  |
 |  |  |  |  |
 |  |  |  |  |
 |  |

1 commento:
Your art is SO creative, wonderful and inspiring. I don't know if you ever link up your creations in any challenges, but I'd like to let you know about one great one. I run Word Art Wednesday - always Anything Goes/Family Friendly. We have amazing sponsors, which means amazing prizes. Right now, our sponsor is the awesome Seth Apter. Seth Apter Designs is offering TWO prizes (two winners) of a $25 gift certificate to each one. This is an AMAZING Mixed Media store www.sethapter.com and I'd sure love to have you play along (both now or any time) at Word Art Wednesday:
www.wordartwednesday.blogspot.com
Your art is wonderful.
Karen Letchworth
Posta un commento