Ciao a tutti e benvenuti a un'altra settimana su Simon Says Stamp Monday Challenge Blog.
Questa settimana la nostra sfida è ispirata all'autunno e vi forniamo anche una splendida Mood Board creata dalla nostra Zoey! Eccola!
Hi all and welcome to another week on the Simon Says Stamp Monday Challenge.
Thank you for joining us for the Stitch It Challenge and we hope you will all join us again this week too.
This week we are challenging you to: FABULOUS FALL MOOD BOARD and the lovely Zoey has made this gorgeous mood board for us to use.
La bellissima mood board di Zoey è davvero ricca di ispirazioni! La mia foto preferita è la terza della prima fila , quella con le fogli e le lucine. Da lì sono partita per realizzare la mia card. E' vero che i miei colori sono più accesi ma del resto... ormai mi conoscete! Solita breve spiegazione in punti dei passaggi principali della realizzazione del background. E' stata una settimana molto impegnativa per me e la mia famiglia e non sono riuscita a fare le foto per il tutorial, però vi racconto come ho fatto!
1) Cartoncino Heavystock , alcuni timbri dai set Leaf Print, Versamark e polvere da embossing Clear in modo da creare il mio amato effetto resist.
2) Colori Distress Spray Stain Crackling Campfire - Aged Mahogany - Wild Honey spruzzati sul tappetino insieme a un po' d'acqua. Dopo aver fatto questo sul tappetino, scivolate la base della vostra card e asciugate con Heat Tool.
3) Dopo aver asciugato, fate la stessa cosa con il colore Burning Ember Mica Stain in modo da dare una patina luminosa in alcuni punti.
4) Nei due angoli della vostra card che sono rimasti vuoti utilizzate lo stencil Markings nello stesso modo che vi ho spiegato la scorsa settimana: Distress Texture Paste Translucent mischiata a Distress Mica Stain Fortune Teller e Burning Ember.
5) Asciugata la pasta, timbro le foglie degli stessi set ma questa volta con la polvere da embossing Garden Patina in modo da creare contrasto di colore.
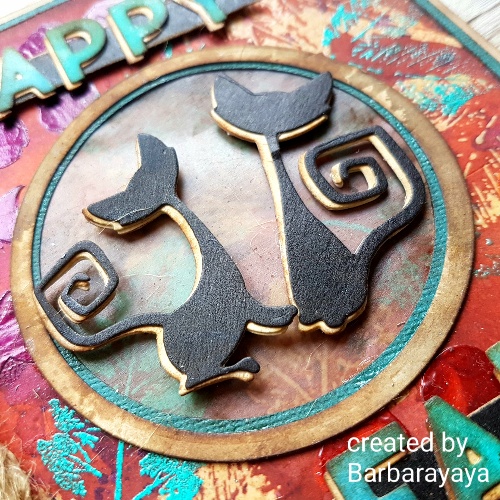
6) A questo punto lo sfondo è finito. Per completare la card ho creato un punto centrale tagliando un cerchio di Vellum e colorandolo con Alcohol Ink Mushroom, poi realizzo una cornice sempre con le fustelle cerchi di diverse misure. Al centro due gatti dalla fustella Mischievous.
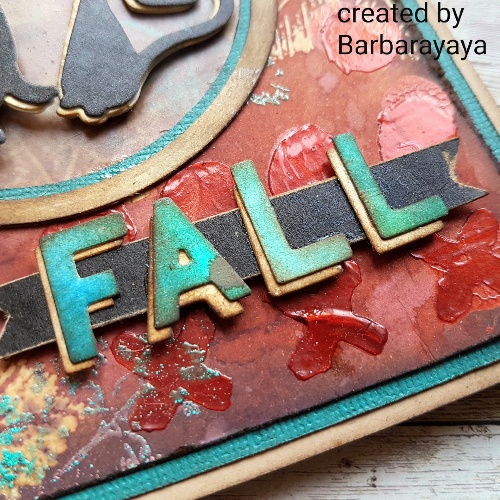
7) La scritta Happy Fall è realizzata utilizzando varie fustelle Sizzix Bold Text tagliando le lettere necessarie da un cartoncino in precedenza colorato con Distress Stain Pescock Feather e Salvaged Patina.
8) Il fiocco è fatto con spago grosso al quale ho aggiunto una piccola zucca Idea-ology.
Zoey's beautiful mood board is really full of inspiration! My favorite photo is the third of the first row, the one with the leaves and the lights. From there I was inspired to make my card. It is true that my colors are brighter but after all ... you know me by now, I'm not able to use often soft colors! As usual below there's a short explanation in points of the main steps of the realization of the background. It was a very busy week for me and my family and I was unable to take the photos for the tutorial, but I'll tell you how I did it!
1) Heavystock cardstock, some stamps from the Leaf Print and Leaf Print 2 stamps sets by Tim Holtz Stampers Anonymous, Versamark and Clear Embossing Powder to create my beloved resist effect.
2) Distress Spray Stain Crackling Campfire - Aged Mahogany - Wild Honey colors sprayed on the mat along with some water. After doing this on the mat, slide the base of your card and dry it with the Heat Tool.
3) After drying, I did the same thing with Burning Ember Mica Stain in order to give a luminous patina in some places.
4) In the two corners of your card that are empty, use the Markings stencil in the same way that I explained to you last week: Distress Texture Paste Translucent mixed with Distress Mica Stain Fortune Teller and Burning Ember.
5) Once the paste is dry, I stamped the leaves of the same sets but this time with the Garden Patina embossing powder in order to create a contrast of color.
6) At this point the background is finished. To complete the card I created a central point by cutting a circle of Vellum and coloring it with Alcohol Ink Mushroom, then I created a frame always with the circle dies of different sizes. In the center, I cut two cats from Mischievous die by Sizzix Tim Holtz.
7) The Happy Fall lettering is made using various Sizzix Bold Text dies by cutting the necessary letters from a cardboard previously colored with Distress Stain Peacock Feather and Salvaged Patina.
8) The bow is made with thick twine to which I added a small Idea-ology pumpkin.
something following this week’s prompt, and add a link in the Inlinkz at the bottom of this post! You can join 5 times so you could have 5 chances to win! How AWESOME is that!! All winners are chosen randomly, so everyone has an equal chance to win! Woo Hoo!! Good Luck to everyone! The Design Team is looking forward to seeing your crafty makes and will pop around to visit you ASAP!
Ci sono favolosi Giveaways e ispirazioni ogni giorno dai nostri favolosi designer su Simon Says Stamp Blog, se non l'avete ancora fatto iscrivetevi via e-mail per essere sempre aggiornati.
Avete tempo fino a Lunedi 08:00 ora Ohio. 13:00 UK tempo, 14:00 CET per postare i vostri lavori!
Saranno scelti alcuni progetti come Designer Spotlight , essi riceveranno uno special badge da aggiungere al loro blog! Potete leggere tutte le regole per partecipare alla sfida sul nostro blog nella side-bar!
There are fabulous Give Aways and inspiration from fabulous designers on a daily basis over on the Simon Says Stamp Blog , if you haven’t subscribed by email you may want to so you don’t miss out
You have until Monday 8am Ohio time. 1pm UK time, 2 pm CET to join in
We will also be choosing 3 of our entries to put in the spotlight – a special honor where we talk about why we loved that entry in particular and award a special badge too! For the full rules, read the “challenge rules” posted in the side-bar here on our blog.
Se volete vedere i vinictori delle sfide o le sfide precedenti potete cliccare nel rettangolo giallo, simile a questo sopra, in fondo alla pagina del Blog di Simon Says Stamp Monday Challenge.
Vi ricordiamo di leggere le regole nella barra laterale del Blog Simon Says Stamp Monday Challenge.
Abbiamo notato da qualche tempo che alcuni progetti che vengono inseriti per partecipare sono stati pubblicati alcune settimane prima per cui seppur attinenti con il tema non possono essere decretati vincitori. I progetti che inserite per partecipare devono essere appena pubblicati. Grazie per la vostra attenzione.
Please note that all previous challenges and winners posts can be accessed by clicking on the button at the bottom of this page
Please read the challenge rules on the sidebar. It has come to our attention that some are entering projects that were posted weeks ago. While they may follow the theme they are not eligible to win the voucher. All creations must be newly published. Thank You
Grazie per essere passati, ci vediamo qui presto!
Thanks for stopping by, see you soon here!
Barbara


Nessun commento:
Posta un commento
Welcome ! Thanks for your visit!