Hi all and welcome to another week on the Simon Says Stamp Monday Challenge Thank you for joining us for the Bright & Cheerful Challenge and we hope you will all join us again this week too.
This week we are challenging you to: FRAME IT.
Ora tocca a voi! Come sempre partecipando alla nostra sfida potrete vincere un buono a estrazione da 25$ da spendere sul favoloso store di SIMON SAYS STAMP! Potete aggiungere fino a 5 progetti per settimana!
The lovely folks over at Simon Says Stamp are generously giving away a FABULOUS $25 voucher to shop at the Simon Says Stamp Store! All you have to do is take out your crafty supplies, make something following this week’s prompt, and add a link in the Inlinkz at the bottom of this post! You can join 5 times so you could have 5 chances to win! How AWESOME is that!! All winners are chosen randomly, so everyone has an equal chance to win! Woo Hoo!! Good Luck to everyone! The Design Team is looking forward to seeing your crafty makes and will pop around to visit you ASAP!
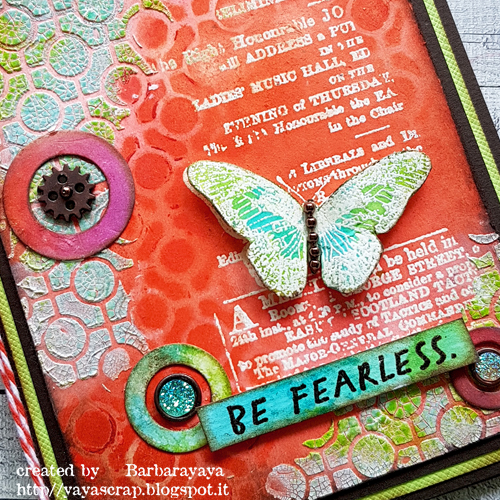
Questa settimana ho preparato una card e anzichè usare una cornice tradizionale ho deciso di crearne una utilizzando i nuovi mini stencil di Tim Holtz Stampers Anonymous. L'ho usata per incorniciare il nuovo timbro dal set Botanic Collage, anch'esso dall'ultima collezione di Tim.
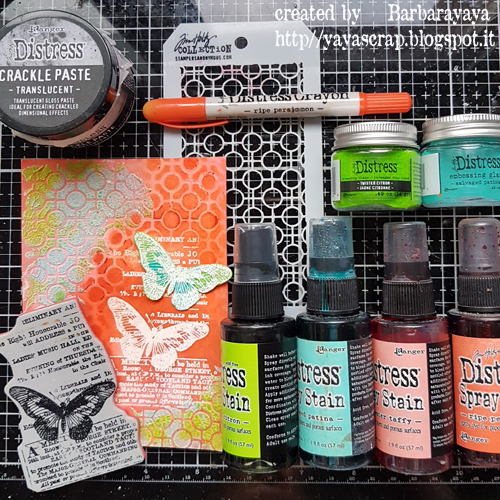
Nelle foto sopra i materiali che ho usato nei vari passaggi che vi spiego in punti qui sotto
1- Preparare la base con un rettangolo di Heavystock e il color Distress Spray Stain Saltwater Taffy.
2- Timbrate con polvere da embossing bianca e Versamark il timbro del set Botanic Collage. Timbratelo anche su un ritaglio di Heavystock in modo da poter ritagliare la farfalla da mettere sopra per dare dimensione al lavoro.
3- Utilizzate la Distress Texture Paste Crackle Translucent e il nuovo mini stencil dal set 52 e cospargete subito con Embossing Glaze Twisted Citron e Salvaged Patina.
4- Quando la Crackle paste è asciutta usate l'Heat Tool per scaldare e sciogliere la polvere. A questo punto potete se volete (io l'ho fatto) potete usare il Distress Crayon Picket Fence tra le crepe per evidenziarle.
5- Ora riposizionate lo stencil in modo da seguire il motivo già presente sulla card e utilizzate il Distress Crayon Ripe Persimmon creanco una specie di cornice al timbro.
6- Spruzzate sulla farfalla che avete timbrato sul ritaglio Distress Spray Stain Twisted Citron e Salvaged Patina, ritagliatela e incollatela. Come corpo della farfalla io ho messo un piccolo segmento di catena
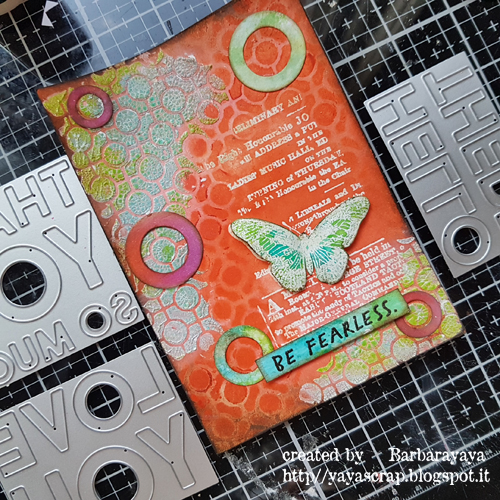
7-A questo punto per riempire e abbellire la card ho ritagliato dei cerchi di diverse dimensioni con le fustelle Sizzix Bold Text. Confesso che avevo dei ritagli già colorati (sapete che io non butto niente e devo dire che spesso è molto utile trovare dei ritagli già pronti!) che si adattavenao benissimo ai colori che ho usato! Tagliati i cerchi li ho posizionati sulla card e seguendo il motivo dello stencil. Li ho riempiti con alcuni anelli di metallo econ qualche abbellimento luccicoso che proviene dalle mie scorte, una confezione di qualche anno fa di Prima Marketing, Art Ingredients Melange Vintage Art Pebbles, non so se sia ancora in produzione.
8- Il sentiment l'ho preso dal nuovo set Notheworthy sempre dall'ultima collezione di Tim Holtz Stampers Anonymous. Spendo due parole per questo set che adoro per diverse motive. La versatilirtà, la varietà di frasi delle quali alcune nuove e veramente molto belle ( es. Stop Overthinking che trovo particolarmente adatta a me!) e il font utilizzato. Secodo me è un set che si userà davvero per molto tempo, penso che sia uno di quei set intramontabili (per quelli di Tim sono tutti intramontabili!) e che possono essere utilizzati in ogni stile possibile.
9- Per finire ho utilizzato un po' di Bakers Twine da una vecchia confezione di We're memory keepers che conteneva alcuni metri in 3 colori diversi e che credo non si trovi più, peccato perche era comodo avere tanti colori a disposizione in una quantità non esagerata come i rocchetti interi di uno stesso colore.
Finita la card! Spero ci sia stato utile leggere i vari passaggi!
In the photos above, the materials I used in the various passages, I explain their use in points below
1- Prepare the base with a rectangle of Heavystock and the color Distress Spray Stain Saltwater Taffy.
2- Stamp the Botanic Collage set with white embossing powder and Versamark. Also, stamp it on a Heavystock cutout so you can cut out the butterfly to put on top to give dimension to the work.
3- Use the Distress Texture Paste Crackle Translucent and the new mini stencil from set 52 and sprinkle immediately with Embossing Glaze Twisted Citron and Salvaged Patina.
4- When the Crackle paste is dry, use the Heat Tool to heat and dissolve the powder. At this point, if you want (I did it) you can use the Distress Crayon Picket Fence between the cracks to highlight them.
5- Now reposition the stencil to follow the pattern already present on the card and use the Distress Crayon Ripe Persimmon to create a kind of frame for the stamp.
6- Spray on the butterfly you stamped on the Distress Spray Stain Twisted Citron and Salvaged Patina cutout, cut it out and glue it. As the body of the butterfly, I have put a small segment of chain
7-At this point, to fill and embellish the card, I cut out circles of different sizes with Sizzix Bold Text dies. I confess that I had some pre-colored cutouts (you know that I don't throw anything away and I must say that it is often very useful to find ready-made cutouts!) That fits very well with the colors I used! After cutting the circles, I placed them on the card and followed the stencil motif. I filled them with some metal rings and some shiny embellishment from my stock, it's a pack of a few years ago from Prima Marketing, Art Ingredients Melange Vintage Art Pebbles, I don't know if it's still in production.
8- I got the sentiment from the new Noteworthy set, always from the latest collection by Tim Holtz Stampers Anonymous. I spend two words on this set which I love for different reasons. The versatility, the variety of phrases, some of which are new and very beautiful (for example "Stop Overthinking" which I find particularly suitable for me!) And the font used. In my opinion, it's a set that will really be used for a long time, I think it is one of those timeless sets (for me Tim's they are all timeless!) And that can be used in any style possible.
9- Finally I made a ribbon using Bakers Twine in orange color, from an old We're memory keepers pack which contained a few meters in 3 different colors and which I believe is no longer available. Too bad because it was convenient to have so many colors available in a small quantity rather than whole spools of the same color.
Card finished! I hope it was useful to read the various steps!
Seguite SIMON SAYS STAMP su INSTAGRAM
Ci sono favolosi Giveaways e ispirazioni ogni giorno dai nostri favolosi designer su Simon Says Stamp Blog, se non l'avete ancora fatto iscrivetevi via e-mail per essere sempre aggiornati.
Avete tempo fino a Lunedi 08:00 ora Ohio. 13:00 UK tempo, 14:00 CET per postare i vostri lavori!
Saranno scelti alcuni progetti come Designer Spotlight , essi riceveranno uno special badge da aggiungere al loro blog! Potete leggere tutte le regole per partecipare alla sfida sul nostro blog nella side-bar!
There are fabulous Give Aways and inspiration from fabulous designers on a daily basis over on the Simon Says Stamp Blog , if you haven’t subscribed by email you may want to so you don’t miss out
You have until Monday 8am Ohio time. 1pm UK time, 2 pm CET to join in
We will also be choosing 3 of our entries to put in the spotlight – a special honor where we talk about why we loved that entry in particular and award a special badge too! For the full rules, read the “challenge rules” posted in the side-bar here on our blog.
Se volete vedere i vinictori delle sfide o le sfide precedenti potete cliccare nel rettangolo giallo, simile a questo sopra, in fondo alla pagina del Blog di Simon Says Stamp Monday Challenge.
Vi ricordiamo di leggere le regole nella barra laterale del Blog Simon Says Stamp Monday Challenge.
Abbiamo notato da qualche tempo che alcuni progetti che vengono inseriti per partecipare sono stati pubblicati alcune settimane prima per cui seppur attinenti con il tema non possono essere decretati vincitori. I progetti che inserite per partecipare devono essere appena pubblicati. Grazie per la vostra attenzione.
Please note that all previous challenges and winners posts can be accessed by clicking on the button at the bottom of this page
Please read the challenge rules on the sidebar. It has come to our attention that some are entering projects that were posted weeks ago. While they may follow the theme they are not eligible to win the voucher. All creations must be newly published. Thank You
Grazie per essere passati, ci vediamo qui presto!
Thanks for stopping by, see you soon here!
Barbara


Incredible, zingy colour contrasts, and amazing textures - this is beyond cool!
RispondiEliminaAlison x